Forcing bulbs: as easy as 1, 2, 3! Source: www.homedepot.com
I already explained in a recent article how to force bulbs in a pot of growing media, but you can also force them with no soil at all, over a container of water.
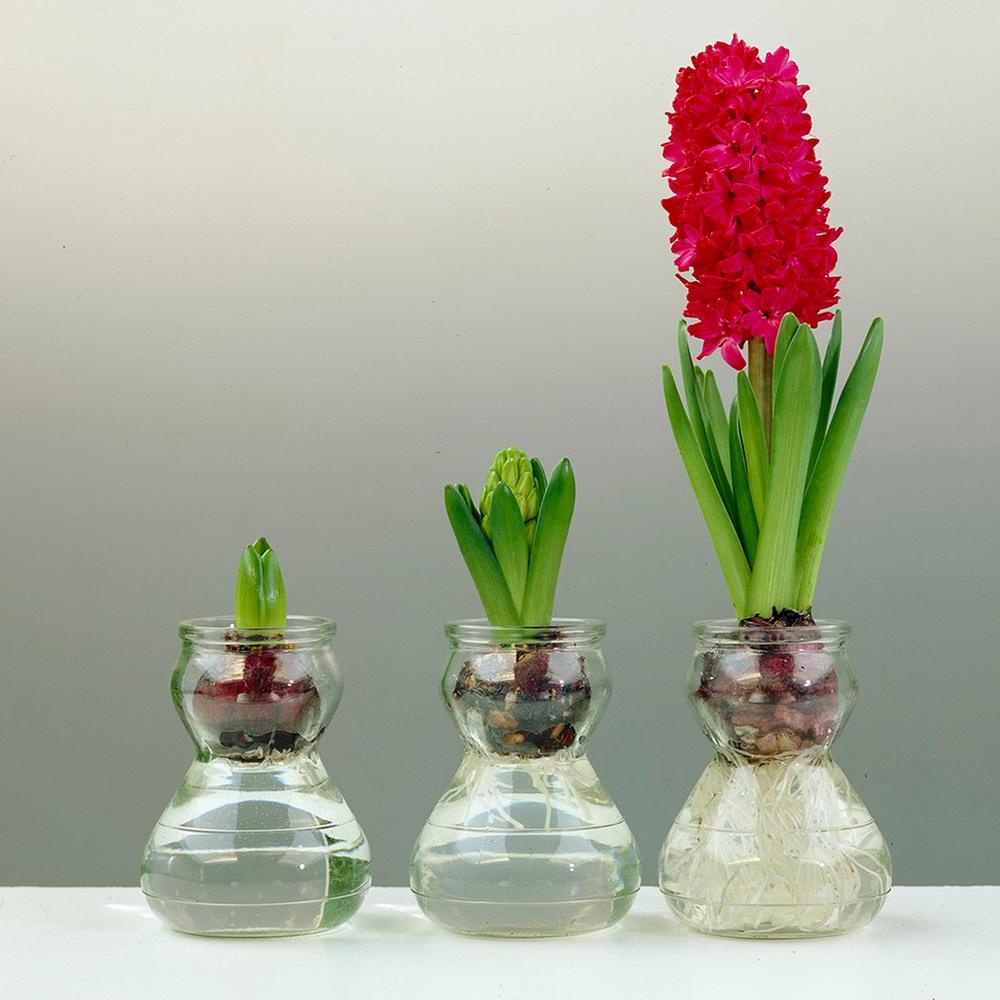
A “hyacinth vase” is typically used for this purpose. It’s a transparent or ceramic hourglass-shaped container designed to hold one bulb. The constriction at the vase’s neck is designed to support the base of the bulb and hold it above the water so it won’t sit in water and rot. Hyacinth vases have been around since at least the 18thcentury and are easy to find in garden center that sells bulbs as well as online.
However, you don’t actually need a hyacinth vase. You can use any container with a neck the right size to hold the bulb suspended above water: for example, a small jam jar might work.
A Great Project for Kids
Forcing bulbs over water is an easy project for children. Source: www.vancouversun.com
I first experienced forcing a bulb in water in kindergarten. I was absolutely fascinated to see the plant grow from roots to bloom in such a short time. And this is something you can do with your children or grandchildren. Also, a bulb is big enough that a child manipulate it and put it in the vase. From about age six on, children are even mature enough to be able to water their sprouting bulb … under the watchful eye of a parent, of course, to remind them about regularly checking the water level.
The bulb traditionally used for forcing over water is the hyacinth (Hyacinthusorientalis). Garden centers sell them from September until near Christmas. Any bulb about the size of a hyacinth bulb could also be used instead, such as a large tulip or narcissus bulb.
Smaller bulbs, like crocus, squills and muscaris, would just fall right through the throat of a hyacinth vase, but if you look, you can find “crocus vases” online that are adapted to smaller bulbs. Plus there are lots of bottles with a constricted throat of an appropriate size. You can even grow an amaryllis (Hippeastrum) bulb over water … provided you find a container with a large enough mouth. And yes, there are amaryllis vases to be found online!
The Best Bulbs for Water Culture
Prepared hyacinths are particularly easy to force. www.waitrosegarden.com
The best bulb for a hyacinth vase is, of course, a hyacinth, but not just any hyacinth: a prepared hyacinth. They come in all the usual hyacinth colors and are just as deliciously perfumed, but have been, as the name suggest, pretreated by gradual cooling so that they have already undergone the “cool winter” needed to encourage bloom. As a result, they don’t absolutely need a chilling period (although cool temperatures—about 50 to 54 ° F (10 to 12 ° C)—are still best). Nor do they really need to be stuck in a dark corner: you can just put them on a window ledge and let them do their thing! And a prepared hyacinths blooms quite quickly: in as little as 6 weeks, although 9 is more likely.
The Paperwhite narcissus (Narcissus papyraceus and its close relatives, such as ‘Grand Soleil d’Or’ and Chinese Sacred Lily) are the best narcissus to use for growing indoors over water, as they don’t require a true chilling period either. They will take normal room temperatures, although night temperatures below 65 ° F (18 °C) are best, and bloom in 5 to 8 weeks.
Other spring bulbs (crocus, squills, muscaris, tulips, other narcissus, etc.) need serious cold (33 to 40° F/1 to 9 ° C) day and night over quite a long period: usually about 14 week, preferably in the dark in a refrigerator, cold room or barely heated garage. (See Forcing Bulbs Without Twisting Arms for more details.)
And finally, there is the amaryllis (Hippeastrum) that needs no cold or dark treatment at all, just a really big vase, coming into bloom in only 5 to 8 weeks. But forcing amaryllis over water is expensive: they’re not cheap bulbs and forced bulbs bloom only once. I prefer to grow amaryllis bulbs in soil so they can be treated not as throw-aways but as true, long-lived houseplants.
So Simple!
The technique is incredibly easy.
Just add water and place the bulb in the vase. Source: www.gardenersworld
Fill the container with fresh water up to the neck and place the bulb, pointed side up, just inside the container, where the neck narrows. The base of the bulb should barely touch the water. Then set the container a cool, dark place.
Roots start to form within days. Source: www.gardenersworld.com
Roots form quickly and reach down into the water. You can let the water level drop considerably once roots are present: they don’t have to be entirely in water, just at least dip into water. Still, take a look every three or four days, adding more water as needed, as bulbs are thirsty creatures and the container should never dry out completely.
When a healthy sprout has formed, the container is filled with roots and the minimum number of weeks has elapsed, the plant can be exposed to light and heat. Flowering then occurs quickly: often starting in barely a week.
When the bulb stops blooming, clean the container and put it away for next year, then drop the bulb into the compost. Being grown over water will have completely exhausted it and it won’t bloom again. Don’t even think of adding fertilizer to the water to “feed” the bulb for another flowering: it will be in no better shape … and your container will quickly fill with algae.
Forcing in Pebbles and More
You can use pebbles or the substrate of your choice. Source: linaloo.typepad.com
You can also easily force bulbs in pebbles or any other fairly inert substrate, such as gravel, clay hydroculture pebbles, seashells, marbles, etc. This is, in fact, still considered forcing over water, as the substrate provides only holds the plant up: it’s the water that makes it grow.
Any decorative container with no drainage hole will do, although a transparent container will make your life easier, because you’ll not be able to see the roots growing (fascinating) and also better monitor the water level. Just drop substrate into the bottom of the container to a depth of anywhere from an inch (2.5 cm) to 5 inches (13 cm) or more. Roots will grow into this layer.
Fill the bottom with substrate, then add bulbs. Source: www.younghouselove.com
Set the bulbs on the substrate. For the most beautiful flowering, fit as many bulbs into the container as it can hold and, although you’ll read otherwise elsewhere, yes, the bulbs can touch! For added solidity, fill the interstices between the bulbs with more substrate, leaving on the tip of the bulbs exposed. Now add water up to the base of the bulbs and place the container somewhere cold and dark. Soon roots will form and the forcing is underway!
All that’s left is to check every now and then, topping up with water as needed, then bring the pots into the light and warmth when the bulbs are ready (see above).
The Paperwhite narcissus is the most common bulb grown in pebbles. Here, in seashells! Source: www.dutchgrown.com
All bulbs suitable for forcing over water are also suitable for pebble forcing, but the Paperwhite narcissus is the most popular for this use.
There you go! A simple little fall project that will bring gorgeous (and often scented) bloom into your home or office during the dark days of winter and early spring. Why hesitate? Just do it!
To provide the best experiences, we use technologies like cookies to store and/or access device information. Consenting to these technologies will allow us to process data such as browsing behavior or unique IDs on this site. Not consenting or withdrawing consent, may adversely affect certain features and functions.
Functional
Always active
The technical storage or access is strictly necessary for the legitimate purpose of enabling the use of a specific service explicitly requested by the subscriber or user, or for the sole purpose of carrying out the transmission of a communication over an electronic communications network.
Preferences
The technical storage or access is necessary for the legitimate purpose of storing preferences that are not requested by the subscriber or user.
Statistics
The technical storage or access that is used exclusively for statistical purposes.The technical storage or access that is used exclusively for anonymous statistical purposes. Without a subpoena, voluntary compliance on the part of your Internet Service Provider, or additional records from a third party, information stored or retrieved for this purpose alone cannot usually be used to identify you.
Marketing
The technical storage or access is required to create user profiles to send advertising, or to track the user on a website or across several websites for similar marketing purposes.


0 comments on “Forcing Bulbs Over Water: A Project for the Whole Family”