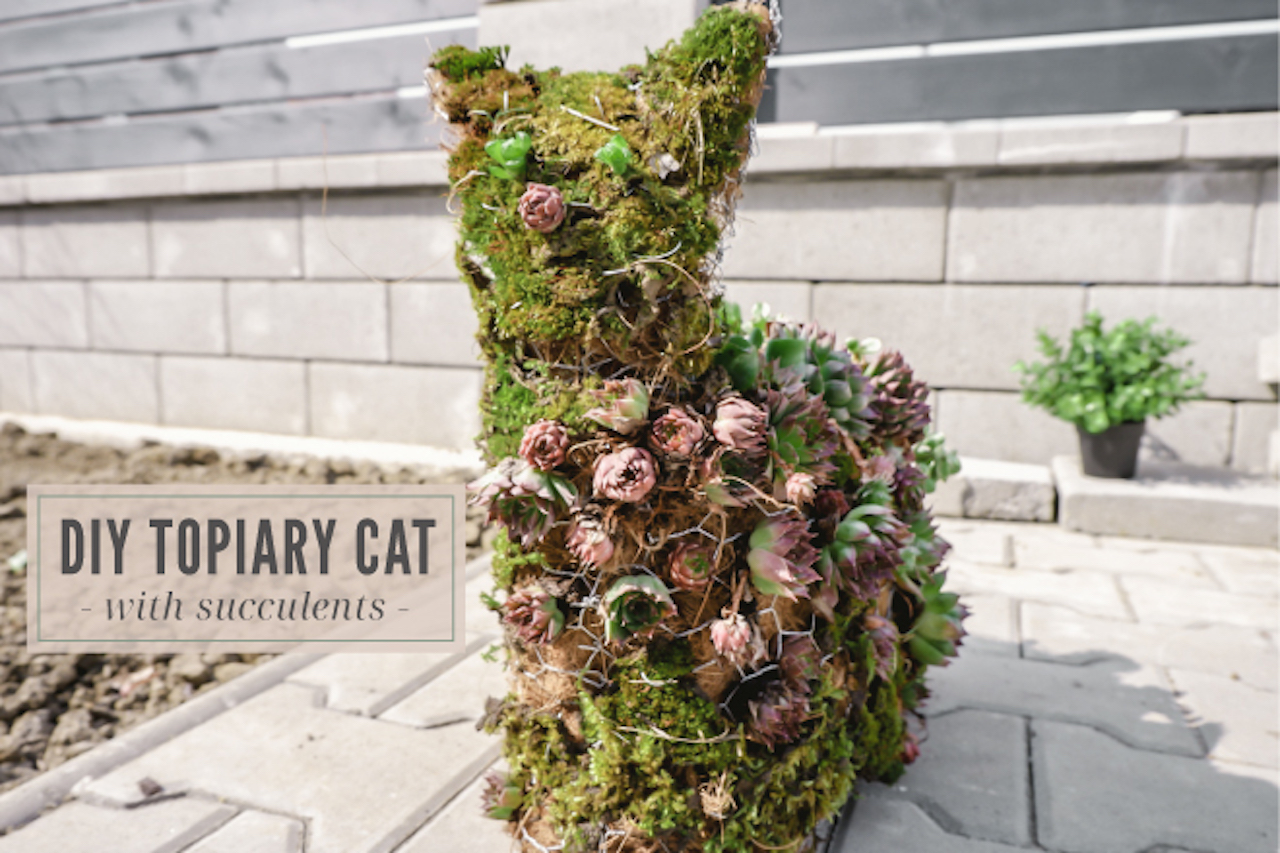
Here’s a fun little DIY project, just in time for your summer garden: create your own topiary cat with succulents!
By Timi Schmidt
The upcoming summer season means that your garden will start looking its best, given that you spend the time and energy on it. You have surely already started working in your garden, ensuring that all the flowers and plants are ready to thrive during the warm season—so why not go the extra mile and add some decorations too?
Topiaries are becoming increasingly popular, ranging from simple shapes to large extravagant sculptures. Creating a topiary or living sculpture may seem like a project that requires some serious skill. However, the good news is that it doesn’t have to!
The following project by Wire Fence shows how to make a DIY Topiary Cat, which could be a unique addition to your garden or porch. And you’ll find that it’s fairly easy to create as well!
What you’ll need:
- Pliers;
- Wire cutters;
- Protective gloves;
- Chicken wire;
- Succulents;
- Moss;
- Multipurpose potting mix;
- Coco basket liners.
Step 1.

Gather your supplies. Make sure you have everything you will need for the topiary before getting started.
Step 2.

Roll out your chicken wire mesh and cut out the shapes shown on the photo above. You will need two pieces of each shape.
Step 3.

Connect the identical shapes by twisting the ends together using pliers and protective gloves.
Step 4.

Once all identical shapes are connected, you should have the body, head and ears. Make sure to leave the bottoms of each shape open, so you can fill them with multipurpose potting mix later.
Step 5.

Cut the coco basket liners into pieces and line each part of the structure with them before connecting them together.
Step 6.

Here is a close-up on what the sculpture should look like with the coco liners before connecting the parts of the sculpture together
Step 7.

Connect all the separate parts together by twisting the loose ends together. Your sculpture should start to resemble a cat now.
Step 8.

Start filling the sculpture with multipurpose potting mix. Make sure you use enough mix, and push it firmly into the sculpture.
Step 9.

Once the sculpture is completely filled, close it up, using the twisting method.
Step 10.

Create holes in the coco lining, inserting the succulents one by one into them.
Step 11.

Add moss to fill the gaps on the sculpture. In order to keep the moss firm, squeeze some of the ends between the wire and lining.
Step 12.

Once you’re happy with the way it looks, place your sculpture into its final spot and water it gently. With time the moss and succulents will become denser and your sculpture will be greener!
About the Author
This guide was created by Timi Schmidt, a blogger and gardening enthusiast. She loves new challenges and interesting new ideas that make your garden look unique.
I love how creative and whimsical this succulent topiary cat project is. It’s a great example of how crafting and gardening can come together to create something truly unique and personal. What I enjoy most about projects like this is the satisfaction of watching a creation take shape step by step. That’s one reason I’m always drawn to other hands-on hobbies as well. I recently discovered this koala kit, and it offers a similar sense of creativity and accomplishment. Whether working with plants or yarn, making something yourself adds a special connection to the finished piece that you just can’t buy.
hi. i love cats and gardens. ..on sunday 15th
please may i ask . i found a couple that do not live on our private road cutting bushes and shrubs of a 74 year old sick man. just survived severe covid been in hospital a week etc lived on the road bought his hoes 36 years ago. i live facing him lived bought our house 34 years ago. that i am a key holder to this mans house. i faced with aggressive. back chat ‘it will be all right .we tell him afterwards a. yet they don’t live on our cul de sac 5 house road. they are merely visiting the rented house. is this un lawful. is this intimidation. they walked past the mans door and his living room window was open and began attacking his hedges. they don’t even reside on the road. PLEASE Can any one offer me help. as the family that rents keep asking if he is considering selling his house and moving. please i need some assistance advise. thank you
I’d call the police.
Weird but kind of fun. Might try it. Would this survive a Zone 5b winter?
Only if you put in hardy succulents, like sempervivum and hardy sedums.