In this third article on artificial lighting, we will look at how to adjust light intensity to suit the needs of your collection without resorting to overly complex measuring devices. Although approximate, this method will enable you to find a suitable starting configuration, which you can then improve based on the results obtained.
First, Assess the Needs of Your Collection
As mentioned in a previous column, light requirements vary greatly from one species to another. For simplicity’s sake, orchids are often classified into three groups: those requiring moderate light (e.g., Paphiopedilum and Phalaenopsis), those requiring intermediate light (e.g., Oncidium and Dendrobium), and those requiring strong light (e.g., Cattleya and Vanda). Information on the requirements of each botanical genus is relatively easy to find on the Internet or in recent publications. It is also recommended that you ask your supplier, at the time of purchase, to indicate the specific requirements of the plant you are interested in, to ensure that it will find the conditions necessary for its growth within your collection.
Secondly, Estimate the Light Output Required for Your Installation
The actual light output available at the foliage level depends on two main parameters: the light output of the luminaire and the distance between the foliage and the luminaire. The greater the distance, the more light output you will need to adequately illuminate the foliage.
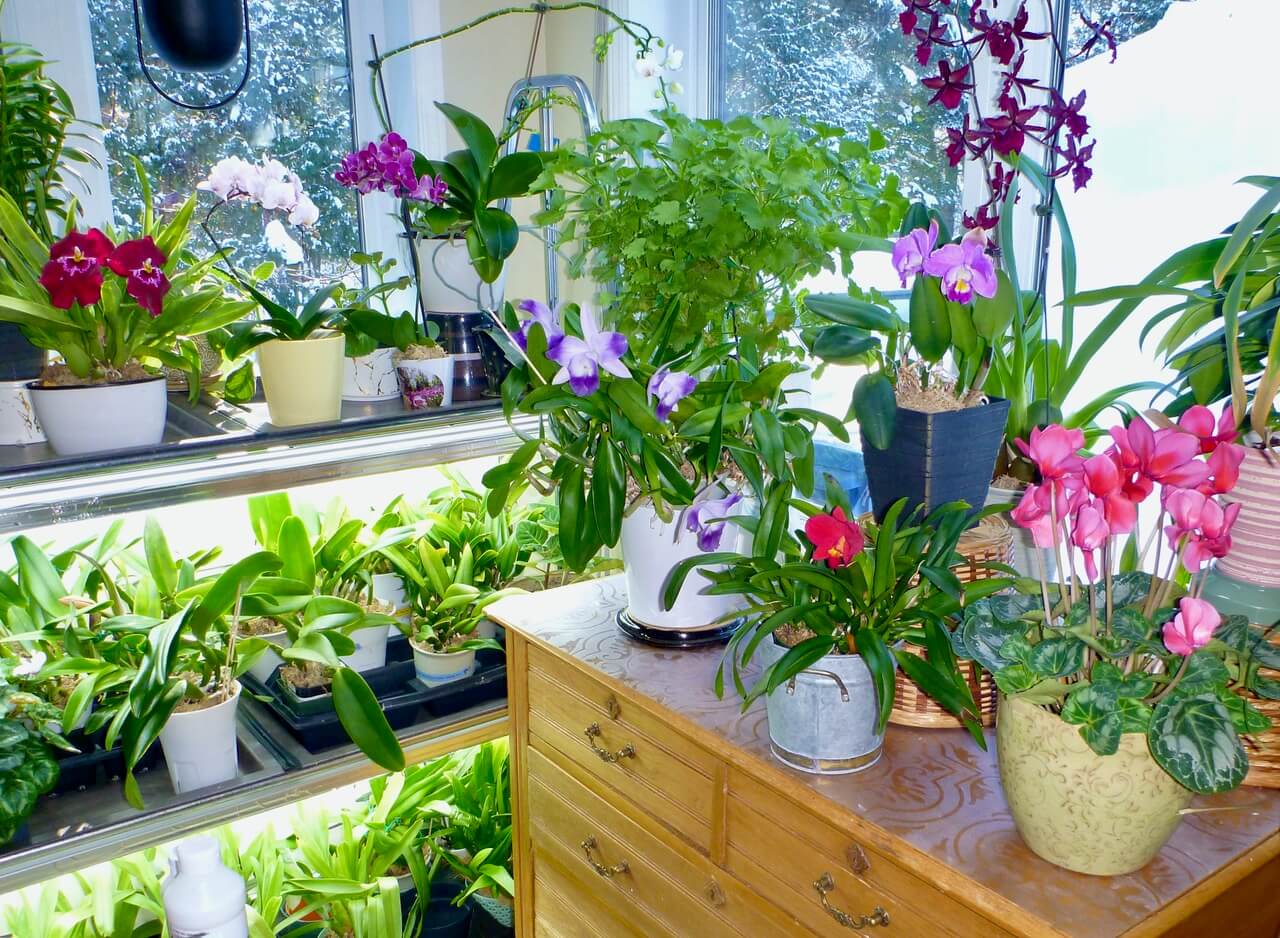
To illustrate this principle, let’s examine the grow rack presented in the previous column. There are three levels: at the bottom, the clearance is 60 cm (24 inches); in the middle, it is 45 cm (18 inches); and the top level offers a clearance of 75 cm (30 inches). Thus, orchids with moderate needs can grow without difficulty with only two 20-watt LED tubes at the middle level (45 cm), while four tubes will be needed at the top level, where the clearance is 75 cm. At the bottom level, where the clearance is 60 cm, 3 x 20 watts will need to be installed to achieve a brightness comparable to the other two levels.
Of course, you can choose to install the same number of LED tubes at all levels. The average intensity will then vary from one level to another.
Guide for Estimating the Required Light Output
Le tableau ci-dessous donne une idée approximative de la puissance d’éclairage requise pour les orchidées de chaque groupe: modéré, intermédiaire et à éclairage fort. Ces puissances sont basées sur l’étagère typique de la photo, munie de tubes DEL de 20 watts (blanc froid), comme recommandé dans nos articles précédents. On part également du principe que la lumière est bien concentrée sur la surface de croissance de chaque niveau (soit environ 120 cm x 45 cm, ou 48 po x 18 po) et qu’il n’y a pas beaucoup de dispersion lumineuse en dehors des étagères.

| Level | Clearance | Moderate needs | Intermediate needs | Strong needs |
|---|---|---|---|---|
| From above | 75 cm (30 in) | 4 tubes x 20 w | 6 tubes x 20 w | 8 tubes x 20 w |
| From the middle | 45 cm (18 in) | 2 tubes x 20 w | 3 tubes x 20 w | 4 tubes x 20 w |
| Du bas | 60 cm (24 in) | 3 tubes x 20 w | 4 tubes x 20 w | 6 tubes x 20 w |
In the case of the demonstration table (also presented in the previous column), there is only one level, but it is even higher: 90 cm (36 in), and the surface to be illuminated is larger: 120 cm x 75 cm (48 in x 30 in). The number of LED tubes (20 watts, cool white) will therefore be even higher for the three groups of orchids, as shown below the photo. The large clearance in this configuration is very useful for displaying flowering orchids without risking overheating them. This configuration is often used to add lighting to an existing window and thus better meet the needs of orchids grown on a windowsill.
A Matter of Preference
Some may prefer to use one or two spotlights rather than 120 cm LED tubes, as the space between the light fixture and the growing surface allows for this. In this case, you will need to choose light fixtures with a total power output equivalent to that of the recommended set of tubes. Be sure to position the spotlight(s) correctly to create as uniform lighting as possible.

| Clearance | Moderate needs | Intermediate needs | Strong needs |
|---|---|---|---|
| 90 cm (36 in) | 4 tubes x 20 w | 6 tubes x 20 w | 8 tubes x 20 w |
| Total | 80 watts | 120 watts | 160 watts |
Third, Watch for Signs of Overexposure or Underexposure.
Given the wide variety of orchid species, it is virtually impossible to accurately list the needs of each one. In practice, you should create a growing environment that is as close as possible to the known requirements of your collection, then periodically observe each plant to ensure that the conditions are suitable. If you follow our columns, you already know that I recommend inspecting all orchids monthly. This is probably the best strategy to adopt. With a little experience, you will easily be able to detect signs of light stress caused by under- or overexposure, and then make the necessary minor adjustments.
In Case of Underexposure
Several leaves will turn dark green, lack the strength to remain upright, and the plants will fail to flower because they will be unable to accumulate the reserves necessary for flowering. In this case, it is possible to move them to the center of the shelf, where the lighting is more intense. You can also turn them to direct the vigorous young shoots toward the most intense light source. It is also possible to place an empty pot upside down under the plant to raise it and bring it closer to the light source. If all these attempts prove insufficient, consider adding LED tubes to your setup.
In Case of Overexposure
The foliage takes on a reddish color as a result of very intense photosynthesis. This phenomenon is frequently observed on young leaves, which are very efficient at producing sugars. This coloration should disappear as the foliage strengthens and protects itself with a thicker cuticle (a thin protective layer on the surface of the leaves). If the mature foliage of your plants remains reddish over time, it is probably because the lighting is too intense for that plant. You will then need to move the plant to a less bright area or increase the space between the plant and the light fixture. If these measures prove insufficient, you may consider unplugging one or two LED tubes to reduce the light output.
However, keep in mind that plants are small chemical processing factories and that light is their only source of energy. To promote optimal growth and beautiful blooms, each plant needs to be provided with plenty of light. In fact, they need to be provided with the maximum amount of light they can tolerate to allow each “mini-factory” to operate at full capacity.
In our next column in this series on artificial lighting, more technical and enthusiastic readers will find some tips on measuring light intensity and quantifying the variations in intensity present in our lighting installations. I promise to keep it as simple as possible.
All photos are by the author.
Editor’s Note
Mr. Charpentier’s orchid articles are published on the Laidback Gardener website under a legal “Copyleft” format. As a result, republication of his columns is permitted provided that the following credit is added: This article was originally published in french on the jardinierparesseux.com website and in the English on laidbackgardener.blog.
One of the most exciting aspects of modern sports betting is the ability to react to events while the match is happening. I discovered this feature more deeply after starting to use Melbet in Bangladesh. The live betting section on Melbet is constantly updating, which allows me to follow the flow of a game and adjust my predictions accordingly. For example, if a football team begins dominating possession early in the match, the odds can shift quickly. That dynamic element makes watching the game much more engaging. Instead of passively observing, I’m actively thinking about what might happen next. When I first wanted to learn how the system works, I came across https://melbetsbd.net/ where I found basic information about accessing the platform. Since then, Melbet has become one of the places where I follow live sports action. I often keep the match on television while monitoring odds on Melbet at the same time. This combination of viewing and interaction makes every goal, corner, or key moment feel more intense. It turns a regular match into a more interactive experience that keeps me fully involved from start to finish.
Lotteries and raffles rely on pure chance, while poker and betting involve strategy and analysis. Digital formats have expanded accessibility significantly. Discussions http://www.ectmih2021.no at ECTMIH 2021 konferanse highlight how different gambling types create varied behavioral patterns. Such distinctions are important for policymakers, educators, and researchers examining risk, motivation, and responsible participation across global markets.